Showing posts with label DIY. Show all posts

Thursday, April 3, 2025

Milk Jug Greenhouse Gardening

Spring is here. Yay sorta... where I live and that means its mostly just winter temps and a lot of rain with a few nice days sprinkled here and there. This is not ideal for young seedlings... UNLESS... you do it in milk jugs. Yep Milk Jugs.  Best part, you can even start plants in winter - yes outside. 


Step 1

Rinse out your empty milk jug. Really any food grade clear or semi clear plastic container will work. Milk jugs are nice because they are wide and relatively easy to cut.

Step 2

Cut almost all the way around the jug about half way up - leave a hinge attached by the handle - about 2 inches.

Step 3

Poke drainage holes in the bottom. 4-5 should do it. You can poke 1-2 on the sides about a 1/2 - 1 inch up incase you get a ton of rain for extra drainage but I don't.

Step 4

Thoroughly wet your seed starting soil. Then fill the bottom half of your jug with your wet seed starting mix. 

Step 5

Place your seeds. You can do more than you would think in a jug because you will be transplanting these out eventually.

Step 6

Label your jug inside and out.

Step 7

Tape (I recommend some form of water resistant tape - duct tape works well) the top back on the bottom creating a decent seal for your jug.

Step 8 

Remove the milk cap - Yes rain and snow will get in there - that is ok. It also will provide ventilation for your seedlings.

Step 9

Place outside in a south facing semi sheltered location and let the magic happen.

Step 10

Once you have past your last frost date AND your seedlings have at least 2-3 true leaves, you can transplant your seedlings into the ground or pots outside. You won't have to harden off your seedlings because they are already used to the fluctuating temps and elements saving you the work of bringing them back and forth / in and out. 

They are ready to thrive. 


Things to consider:

  • Check your seedlings about once a week for progress. (Lets be real you and I both know you are going to check them way more often than that LOL)
  • These are really low maintenance. You usually don't have to re-water, but if there is no moisture on the sides, give your baby plants a drink. 
  • If the temps are pretty warm or it's really sunny you will want to un-tape the jugs to vent so the seedlings don't scorch.
  • Some varieties can be started in winter. Anything that is relatively cold hardy will do great, especially if those seeds need stratification. (brassicas, onions seeds do really well, parsley, cilantro) 
  • Other varieties of heat loving plants would do better to start a little later (tomatoes, peppers and so on)
  • You can usually get a good amount of milk jugs from coffee shops. If you call them in the morning and ask them to save you a bag of them, most will. You can get about 20+ jugs in a day this way for free. Make sure to rinse them out first.
  • I recommend keeping a gardening journal to track what went well, what plants you tried and when you started them.




Wednesday, April 12, 2023

Korean Beef & Sending a Meal to Someone

When I had my babies one of the things that helped the most was meals prepared by other people. You know the kind that don't require you to return dishes to people (and remember who gets what dishes) are easy to get ready and serve. The fewer the dishes to wash the better.


There are actually many times a prepared meal can be helpful and in my experience these are not the times people want to entertain visitors; no matter how much you want to sit and chat. Be respectful of their needs and know it is not the time to entertain you; I don't care how cute the baby is.  In these instances ding-dong-drop-off-&-ditch is usually best.

Also note, try to be respectful of their cultural, religious, medical, or dietary restrictions if you can. 

Times when a prepared meal can be helpful:
  • after the birth of a baby 
  • after an adoption/foster placement of a child (I see you! Well done!)
  • after a surgery
  • during an illness
  • after the loss of a loved one
  • moving (moving is hard work and stressful)
  • Major life events of change
  • Just because you want to share the love

So that said, here is a great meal to make for yourself, your family, a friend or a loved one. My sister made this particular recipe for me and it was a huge hit in my house. So much so that when I had my second baby and she asked "What can I do to help?" I instantly replied "Make me more Korean Beef!" (she did!) After that I had to get the recipe and she did share it with me. I was thrilled with how simple it was to make. The nearest grocery store & my pantry had everything I needed.


KOREAN BEEF

Ingredients

  • 1 pound lean ground beef or ground turkey (either tastes great)
  • 3 garlic cloves minced
  • 1/4 cup packed brown sugar
  • 1/4 cup reduced-sodium soy sauce
  • 2 teaspoons sesame oil
  • 1/4 teaspoon ground ginger
  • 1/4 teaspoon crushed red pepper flakes
  • 1/4 teaspoon pepper
  • 2 cups hot cooked white or brown rice
  • sliced green onions and sesame seeds for garnish

Instructions

  1. In a small bowl whisk brown sugar, soy sauce, sesame oil, ginger, red pepper flakes and pepper. Set aside.
  2. In a large skillet add 1 Tbsp of vegetable oil. Add minced garlic and cook for 1 minute while stirring. Add the ground beef and cook the ground beef and garlic breaking it into crumbles over medium heat until no longer pink.
  3. Pour sauce over the ground beef and let simmer for another minute or two.
  4. Serve over hot rice and garnish with green onions and sesame seeds.

Options
I like to add any combination of the following vegetables for texture. You can add them to the meat while in the skillet and cook them to tender crisp before adding the sauce.

* sugar snap peas
* snow peas 
* broccoli florets

This dish freezes really well too. So if you are inclined to make a meal for someone after a baby/surgery/funeral this is a great option. Just let them know it will need to thaw prior to warming. You can also purchase ready made rice in pouches that just need to be microwaved which can be nice if you are preparing this for someone else.


Monday, February 27, 2023

Keeping Warm Without Power

My area was recently hit with two ice storms back-to-back. Many of my friends lost power. They mentioned how cold they were (Michigan winters be cold ya’ll). There are some ways to provide some heat to your home without power and provide some light. In a situation where freezing inside your home doesn’t sound like a great option there are some things you can do.


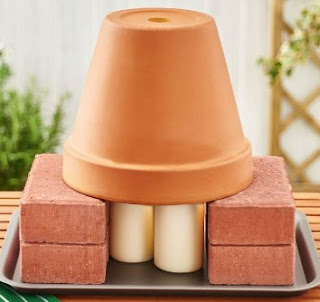
Terracotta Pot Heater


(alternately you could use the stoneware part of a crock pot in a pinch)


What you need:

Terracotta pot (or pan/pot)

2 Bricks

Candles (tealights, jar candles, whatever you have)


Instructions:

Light your candle

Place your two bricks on either side of it (or them if you have tea lights)

Set your terracotta pot upside down on your bricks.

You could use a metal pot, a cast iron pan/pot or a crock pot if you don't have terracotta pots. Cast iron would be ideal as they hold heat very well and could be a cooking surface if really needed.


How it works:

The bricks allow air to flow to the flame and the terracotta pot will trap heat and help to warm a small space. The heat will be proportionate to the size of the pot and number of candles. If you have a two-wick candle even better.


Crisco Candle

This will burn for at least a whole day or possibly longer


What you need:

can of Crisco

Candle 

Fire safe surface

(Canning Jar if you have it)


Instructions:

Open can of Crisco

Measure your candle to be pretty much level with the Crisco.

Cut your candle shorter if you need (or don’t)

Push it right down the center of the Crisco

Light


Things to consider:

Obviously the first is fire safe surfaces – place your candles on a surface that does not burn. Examples: plate, terracotta saucer, thin brick, tile, etc…


This is an emergency method. Ideally you would want to spoon the Crisco as tightly as possible into a canning jar (for safety reasons) and then push the candle in. That said when you have limited options and it is the difference between freezing/hypothermia it is a better alternative.


You could then use this under a terracotta pot should you wish to.


If you google “Terracotta Pot Heater” you will see several different ways to do this.


Stay safe and stay warm folks.


Thursday, February 23, 2023

Fire Cider

1/2 gallon jars of Fire Cider just filled.
I love how pretty it looks.

What is Fire Cider? 

Fire cider is a spicy tonic used to prevent and treat colds by supposedly boosting your immune system. It’s also said to improve blood circulation and digestion, among other benefits. Fire cider is a popular yet controversial tonic. It’s used in alternative medicine to boost immunity, fight colds, and to soothe symptoms like cough, congestion, or sore throat, even though skeptics argue that it’s nothing more than a spicy concoction. 

The Benefits of Fire Cider:


I personally disagree on the “controversial aspect” from personal experience. I use this and swear by it. I have little kids and kids come with colds… often. Our household has had SEVERAL rounds of various bugs come through this season and did not get even one of them. And if you have littles in your home, you know they are happy to share every bug they get. I make this in mid September so I have it ready to go for cold & flu season but you can make it any time of the year.

Just about every ingredient in it is known to boost immunity, add good flora, kill bacteria and viruses, boost circulation, act as an antioxidant, or act as an anti-inflammatory.

  • Fire cider starts with raw apple cider vinegar (also known as ACV), which has become more and more popular as a health drink by itself, which is made from fermented apples and packed with “good” bacteria. 
  • Fire cider can boost energy or be invigorating; many people drink it for this reason alone.
  • Ginger and ACV are believed to calm indigestion and promote gut health.
  • Garlic may have a positive impact on blood pressure and cholesterol.
  • Horseradish has been used to treat sinus infections and urinary tract infections.
  • Citrus fruits contain Vitamin C which has been used for years to boost immunity.
  • Turmeric is a great anti-inflammatory. In order to active the benefits of turmeric you will need to include black pepper.
  • Honey can ease coughing and improve cholesterol. 

You can look up the health benefits to each ingredient if you are interested.

That said, I am not a doctor, nor do I have conditions that may indicate that use is contradicted (such as acid reflux). You will need to make your own decisions for your health based on your research, conversations with your health professionals and conscious. 


Ingredients: 

The Basics: These are the foundation for fire cider. 

  • Apple Cider Vinegar (with the Mother)
  • Ginger (½  cup shredded, sliced, or chopped per ½ gal jar)
  • Turmeric (¼ cup shredded, sliced, or chopped per ½ gal jar)
  • Horseradish (¼ cup shredded, sliced, or chopped per ½ gal jar)
  • Cayenne Pepper (1-2 whole sliced in ½ per ½ gal jar)
  • Onion (1 med sliced or quartered)
  • Garlic Cloves (3-4 cloves diced, sliced, or chopped) 

Optional Add-ins: I add all of this to my jars

  • Lemon (Sliced or Quartered – 1 whole per ½ gal jar)
  • Lime (Sliced or Quartered– 1 whole per ½ gal jar)
  • Orange (Sliced or Quartered– 1 whole per ½ gal jar)
  • Rosehips (½ cup fresh sliced in half or 1 TBSP dried per ½ gal jar)
  • Cranberries (½ cup fresh sliced in half or ¼ cup dried per ½ gal jar)
  • Pomegranate Arils (¼ cup fresh per ½ gal jar)
  • Oregano (1 tsp dried or 1-2 sprigs fresh per ½ gal jar)
  • Rosemary (1 tsp dried or 1-2 sprigs fresh per ½ gal jar)
  • Jalapeno (1 whole sliced in ½ per ½ gal jar)
  • Chili’s (1 whole sliced in ½ per ½ gal jar)
  • Star Anise (3-4 whole per ½ gal jar)
  • Whole black peppercorns (1 Tbsp per ½ gal jar


Directions: 

  • Wash your ingredients first.
  • Then put all of your solid ingredients into your clean sterilized jars. I use half gallon jars and do 3 at a time. This usually results in about 6 pints of fire cider in the end. Really pack them in if you need too.
  • Then top with Apple Cider Vinegar. It is important that it has the mother in it. I use Bragg’s personally. (you can use pasteurized apple cider vinegar if you prefer) Fill it to about ½ in headspace.
  • Place wax paper over the opening and then the lid and then the rim. This will help prevent oxidation of the metal rim from the vinegar.
  • Let sit in a cool dark place for 4-6 weeks shaking occasionally. I have let mine sit 6-8 week and actually prefer it that way but 4-6 weeks is enough.
  • After 4-6 weeks strain ingredients through a cheese cloth.
  • Store the strained liquid in clean sterilized pint mason jars until you are ready to use.  
  • (don’t throw out the pulp yet more on that to come below)


 To Consume: 

  • 1 Tbsp fire cider
  • 2-3 tsp honey (trust me you want this, I prefer it closer to 3)
  • ½ cup warm (not hot) water
  • Mix well until honey is dissolved.
  • Drink like a shot 

To be clear this isn’t meant to be a yummy drink; it has some… kick. There is a reason it is called fire cider. I don’t mind the flavor once I add the honey. The moment I feel under the weather, or a bug makes itself known in our home, I start taking fire cider in the morning and before bed. 


Things to consider:

Taken alone, apple cider vinegar is very acidic, which can damage tooth enamel, especially if you’re drinking a shot daily. To minimize the risk, I dilute it with warm water and then swish with water after drinking fire cider.

The super acidic drink may cause more serious damage to the esophagus (particularly if you have acid reflux, GERD or Barrett’s esophagus) or lungs. Again, diluting in water is a safer way to drink fire cider.

Speaking specifically to pregnancy; my particular recipe for fire cider uses raw apple cider vinegar, which is unpasteurized and may contain harmful pathogens though not in my experience. I want the flora in the unpasteurized ACV for my gut. However, it is not advised to consume unpasteurized products during pregnancy.

If you have any health conditions, are on medications, or are pregnant or breastfeeding, talk with your healthcare provider first.  


How Do You Store Fire Cider?


Fire cider contains vinegar making it an unsuitable environment for bacteria. Many of the ingredients also inhibit bacteria growth (garlic for example). Vinegar is used to preserve foods. It’s safe to keep in the pantry for several months (in a tightly sealed jar), but it will last even longer if stored in the fridge. 


Now What to do With the Fire Cider Pulp?

Before drinking fire cider, most people strain out the “pulp” This pulp consists of the vegetables/fruits/herbs/spices that were put into the vinegar, which soften considerably during fermentation, usually disintegrating a bit. The pulp still has plenty of flavor and potential benefits, so don’t throw it out!

Some people will mix up pulp into mustard and spreading on a sandwich (depending on which ingredients they use), mix with mayo and use for dipping fries or veggies, mix with jam for a sweet-spicy glaze for meat, or toss some pulp into a stir-fry for a spicy kick.

I usually puree it and then put it into my dehydrator (if I had a freeze dryer, I would use that but I don’t). Once it is fully dried, I powder it in my ninja bullet and put into veggie capsules to capture more of the benefits. I take one capsule in the morning and one at night. With the recipe above I get about 1 pint of powdered fire cider, which is quite a bit.

If you have no interest in saving the pulp for any purpose, you can throw all of it into your compost pile! Your compost pile will also reap the benefits of your fermentation.


Stay healthy!


Friday, July 1, 2022

Companion Planting & Why Marigolds are Rock Stars

Marigolds in my flower garden add a pop of bright color

Companion Planting? The first time I heard that term I was like "Huh?... Uh is that where you and your spouse/significant other do gardening together?" Needless to say, I was way off.  That was quite a long time ago. Since then I have strived to learn a fair amount about this. I use it in my garden and it I have found it really does make a difference in 3 major areas. Production, Pest Control and Presentation. 


Marigolds hanging out with Squash
Marigolds are hands down my most favorite companion plant. If you are wanting to keep it simple and get the most bang for your buck, marigolds are the way to go. They have been used as natural pest control in gardens for centuries and are a pest control powerhouse. Here are just some of the benefits they help provide:


First and foremost they attract pollinators. If you want to have heavy production in your vegetable garden this will be a great addition. They bloom for a long time and right into fall. For those who do succession planting this is particularly helpful as is great for attracting pollinators at all stages of your garden.  


Some gardeners swear they can help deter mosquitos. I tend to listen to experienced gardeners. They have lots of years of experience and many times information has been handed down through generations. I am a mosquito magnet so I will take all the help I can get. 


Marigolds hanging with the beans

They help ward off harmful nematodes, bean beetle, cabbage moths, slugs, tomato hornworm, and some other pests that like to munch on tomatoes.   How does this work. Well for some pests they don't like the strong smell. Meaning it can mask your desired crops from pests. For other pests they function as a trap crop. Slugs love marigolds. Often this means that your other crops are saved from loss because your marigolds will draw them away from those crops. Regarding harmful nematodes, marigold roots do the work here. 


They are natural companions to the following: cucumbers, melons, potatoes, lettuce, beans, asparagus, tomatoes, brassicas (ie broccoli, cabbage, kale, cauliflower, brussels sprouts), squash/pumpkins, egg plant and onions. Natural companion can also mean they enhance the growth, flavor or health of these plants.  For many other plants they are considered a neutral companion. This means they nether particularly help or harm. At the very least for those plants they act as a pollinator attractant.


They bring beauty and a pop of color to any garden. I do love the lush green of my kale but that pop of the oranges, yellows and reds always brings a smile to my gardeners heart. Gardens are meant to be enjoyed for many purposes including the visual aesthetics. Marigolds come in many different colors, sizes, varieties and variations so there are lots of options to choose from. I really love the two toned varieties.


My little guy sampling 
some Okra last year and a little
marigold peeking in the
bottom right with

The flowers are edible. Making this a harvestable crop. Want to add a splash of color to your salad? Pop the petals off a bloom and sprinkle them in your salad or you can add them to a vinaigrette. There are lots of ways to use them.  They are rich in vitamin C and antioxidants (antioxidants are cancer fighters). 


I also have small children and I want them to enjoy and experience the garden in lots of ways. Gardening can be so much fun for little ones and a great way to teach them skills. This means when I am planting things I want them to be non toxic to my tiny people. 


Just a lovely French Marigold
(my favorite)
They have many medicinal uses as well. Calendula and marigolds are of the same family. Thus marigolds also have many of the same properties.  Some of the things they have been used for are sores, inflammation, some skin conditions and itching. I could write an entire blog on that alone, but for today I will say, if that interests you there is much information available on the internet and in books. Do your own research before using herbal medicine or work with a trusted and trained herbalist.


The seeds are VERY easy to harvest. Let the flowers dry out when they are done blooming and there you go. You have a handful of seeds that can be saved for the next season.


So yes this plant knocks it out of the park when it comes to earning it's keep in the garden. For all of the reasons stated above marigolds get my vote for best companion plant. That said it is not the only plant that is a companion plant. There are lots more. I also use onions mixed in with my brassicas to help reduce pest pressure. (Oh you pesty cabbage moth... we just can't be friends.) 


If you would like to learn more about companion planting here are some great resources:


List of resources / books / sites:


BOOKS:


WEBSITES:


Tuesday, March 22, 2022

Canning Homemade Spaghetti Meat Sauce

Have you ever read the back of a jar and wondered "what the heck is that ingredient?" yup me too. Its one of the reasons I started canning food. I wanted to know what my family was actually putting into their bodies. If you have ever read my blog you know I like to garden and grow my own food. What better way to use that food than to make spaghetti sauce?!

You will need the following:
A large stock pot or a large roasting pan.
A large pot to blanch fresh tomatoes
6-8 Quart sized canning jars, lids, rims
Pressure Canner
Canning Lifter
Canning Jar Funnel
Debubbler
White Vinegar


Meat:
1-2 lbs of ground meat 
(I like to use 1lb lean ground beef and 1 lb ground chorizo)

Veggies:
15 - 20 Tomatoes depending on size - blanched and peeled
I find that paste tomatoes work best here such as Roma, Amish Paste, and so on but you can use other kinds too and I often do.
   (you can also use canned tomatoes too if you don't have fresh)
2-3 Onions chopped (I use red, white and yellow - your choice)
1-2 Roasted Bell Peppers - peeled and chopped
2-3 carrots shaved and diced.

Seasonings:
5 Garlic cloves minced

1 Tbsp each:
Basil, 
Italian Seasoning, 
Fennell
Red Pepper flakes (I do 1/2 Tbsp)
Salt/Pepper
1/2 cup sugar (if you like it in your sauce)
and any other seasoning you like 


Brown your meat first and then drain off any excess fat and return to pan.
Add chopped onions & carrots and saute on medium heat until onions are translucent 
Next add diced bell peppers and 
Rough chop tomatoes and add to pot
Let it simmer for a bit (10-15 min)
Add seasonings and give it all a stir

I usually let it simmer on low for 30 min and then give it a taste and that is how I determine how much sugar to add. (it is usually the full 1/2 cup if not more)

I will then let it simmer on LOW for most of the day stirring occasionally. The extra liquid cooks off and the flavor is lovely.

When you are satisfied that it is ready for canning, set up your clean jars, lids and rims.

Fill jars leaving 1 inch head space.
De-bubble 
wipe rims with a clean cloth or napkin dipped in vinegar (This gets any splash or oils from rim and helps ensure proper seal)
add lids and rims to finger tight

Place into your pressure canner


Because this recipe contains meat we do need to use a pressure canner.  Follow the instructions for your specific canner model and your altitude.

Table 1. Recommended process time for Spaghetti Sauce With Meat in a dial-gauge pressure canner.
 Canner Gauge Pressure (PSI) at Altitudes of
Style of PackJar SizeProcess Time0 - 2,000 ft2,001 - 4,000 ft4,001 - 6,000 ft6,001 - 8,000 ft
HotPints60 min11 lb12 lb13 lb14 lb
Quarts7011121314

Table 2. Recommended process time for Spaghetti Sauce With Meat in a weighted-gauge pressure canner.
 Canner Gauge Pressure (PSI) at Altitudes of
Style of PackJar SizeProcess Time0 - 1,000 ftAbove 1,000 ft
HotPints60 min10 lb15 lb
Quarts701015


If you prefer to omit the meat in your sauce use the table below to adjust your times.


Table 1. Recommended process time for Spaghetti Sauce Without Meat in a dial-gauge pressure canner.
 Canner Gauge Pressure (PSI) at Altitudes of
Style of PackJar SizeProcess Time0 - 2,000 ft2,001 - 4,000 ft4,001 - 6,000 ft6,001 - 8,000 ft
HotPints20 min11 lb12 lb13 lb14 lb
Quarts2511121314

Table 2. Recommended process time for Spaghetti Sauce Without Meat in a weighted-gauge pressure canner.
 Canner Gauge Pressure (PSI) at Altitudes of
Style of PackJar SizeProcess Time0 - 1,000 ftAbove 1,000 ft
HotPints20 min10 lb15 lb
Quarts251015


Once you have completed the pressure canning, you just need to wait until the pressure indicator on your canner lets you know that it is ok to open the canner.

CAUTION: 
NEVER EVER open your canner before the safety indicator is down, EVER. It is extremely dangerous to do so. 

As I was saying, once it is safe to open your canner, use your jar grabbers to pull them out and set on a towel on your counter to finish cooling. Let cool in a NON-drafty area for 24 hours. Do not adjust rims. After 24 hours check that each jar is sealed and remove rims.

I usually will do 12-16 Quarts a year. My family usually has spaghetti or some pasta dish at least once a month if not more so this is really nice to have on hand. 


Send Me A Message

Name

Email *

Message *