Showing posts with label Survival. Show all posts

Thursday, April 3, 2025

Milk Jug Greenhouse Gardening

Spring is here. Yay sorta... where I live and that means its mostly just winter temps and a lot of rain with a few nice days sprinkled here and there. This is not ideal for young seedlings... UNLESS... you do it in milk jugs. Yep Milk Jugs.  Best part, you can even start plants in winter - yes outside. 


Step 1

Rinse out your empty milk jug. Really any food grade clear or semi clear plastic container will work. Milk jugs are nice because they are wide and relatively easy to cut.

Step 2

Cut almost all the way around the jug about half way up - leave a hinge attached by the handle - about 2 inches.

Step 3

Poke drainage holes in the bottom. 4-5 should do it. You can poke 1-2 on the sides about a 1/2 - 1 inch up incase you get a ton of rain for extra drainage but I don't.

Step 4

Thoroughly wet your seed starting soil. Then fill the bottom half of your jug with your wet seed starting mix. 

Step 5

Place your seeds. You can do more than you would think in a jug because you will be transplanting these out eventually.

Step 6

Label your jug inside and out.

Step 7

Tape (I recommend some form of water resistant tape - duct tape works well) the top back on the bottom creating a decent seal for your jug.

Step 8 

Remove the milk cap - Yes rain and snow will get in there - that is ok. It also will provide ventilation for your seedlings.

Step 9

Place outside in a south facing semi sheltered location and let the magic happen.

Step 10

Once you have past your last frost date AND your seedlings have at least 2-3 true leaves, you can transplant your seedlings into the ground or pots outside. You won't have to harden off your seedlings because they are already used to the fluctuating temps and elements saving you the work of bringing them back and forth / in and out. 

They are ready to thrive. 


Things to consider:

  • Check your seedlings about once a week for progress. (Lets be real you and I both know you are going to check them way more often than that LOL)
  • These are really low maintenance. You usually don't have to re-water, but if there is no moisture on the sides, give your baby plants a drink. 
  • If the temps are pretty warm or it's really sunny you will want to un-tape the jugs to vent so the seedlings don't scorch.
  • Some varieties can be started in winter. Anything that is relatively cold hardy will do great, especially if those seeds need stratification. (brassicas, onions seeds do really well, parsley, cilantro) 
  • Other varieties of heat loving plants would do better to start a little later (tomatoes, peppers and so on)
  • You can usually get a good amount of milk jugs from coffee shops. If you call them in the morning and ask them to save you a bag of them, most will. You can get about 20+ jugs in a day this way for free. Make sure to rinse them out first.
  • I recommend keeping a gardening journal to track what went well, what plants you tried and when you started them.



Monday, February 27, 2023

Keeping Warm Without Power

My area was recently hit with two ice storms back-to-back. Many of my friends lost power. They mentioned how cold they were (Michigan winters be cold ya’ll). There are some ways to provide some heat to your home without power and provide some light. In a situation where freezing inside your home doesn’t sound like a great option there are some things you can do.


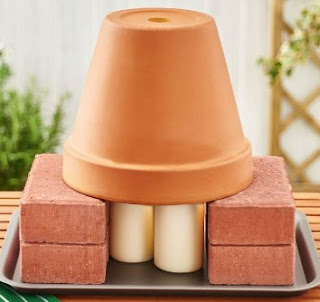
Terracotta Pot Heater


(alternately you could use the stoneware part of a crock pot in a pinch)


What you need:

Terracotta pot (or pan/pot)

2 Bricks

Candles (tealights, jar candles, whatever you have)


Instructions:

Light your candle

Place your two bricks on either side of it (or them if you have tea lights)

Set your terracotta pot upside down on your bricks.

You could use a metal pot, a cast iron pan/pot or a crock pot if you don't have terracotta pots. Cast iron would be ideal as they hold heat very well and could be a cooking surface if really needed.


How it works:

The bricks allow air to flow to the flame and the terracotta pot will trap heat and help to warm a small space. The heat will be proportionate to the size of the pot and number of candles. If you have a two-wick candle even better.


Crisco Candle

This will burn for at least a whole day or possibly longer


What you need:

can of Crisco

Candle 

Fire safe surface

(Canning Jar if you have it)


Instructions:

Open can of Crisco

Measure your candle to be pretty much level with the Crisco.

Cut your candle shorter if you need (or don’t)

Push it right down the center of the Crisco

Light


Things to consider:

Obviously the first is fire safe surfaces – place your candles on a surface that does not burn. Examples: plate, terracotta saucer, thin brick, tile, etc…


This is an emergency method. Ideally you would want to spoon the Crisco as tightly as possible into a canning jar (for safety reasons) and then push the candle in. That said when you have limited options and it is the difference between freezing/hypothermia it is a better alternative.


You could then use this under a terracotta pot should you wish to.


If you google “Terracotta Pot Heater” you will see several different ways to do this.


Stay safe and stay warm folks.


Thursday, February 28, 2019

Rendering Lard / Tallow

So I don’t know about you, but I love me some bacon grease for cooking. I mean… it’s bacon… Come on. I save mine in a mason jar in the fridge and love to pop a Tbsp into a skillet of potatoes or green beans other items. It adds so much flavor so why waste it. (I cook my bacon LOW and SLOW and it renders out the fat beautifully)... yeh I know.. super healthy. blah blah blah...

Sometimes I will have an abundance of pork or beef fat and I will render them down into lard or tallow. (Lard is from pork fat and Tallow is from beef fat - technically you can get tallow from other animals too). I had a weekend that was such a time. I did not want to waste that beautiful fat.

So the first step is to chop up the fat into small pieces. If you have a meat grinder, PERFECT! The smaller the pieces the faster the fat is rendered out. It is easier if the fat is cold or partially frozen. You will want to try to keep as much of the meat out as possible. I usually end up with a bowl of meat scraps that are perfect for making soups or stews or if they are really gnarly looking I will use them for making broth

Next you have a couple of choices. You can use a crock pot on the warm or low setting OR you can use a large pot on low OR you can put it into the oven on warm. You are essentially trying to melt the fat at the lowest heat possible to not scorch the fat.

Throw your chopped up fat into the container you are using. I use a large stock pot or crock pot. I usually add 1-2 cups of water to start to prevent scorching. It will cook out via evaporation. I keep stirring the pot until some of the fat is melted out and then it is just a waiting game from there. It takes a few hours so don’t plan on going anywhere and don’t forget to stir every so often. I generally usually use a wooden spoon for this.
 
After several hours the "bits" turn a golden color (these are called the cracklin’s and some people absolutely love these crispy bits as snack items or on salads… to each their own) and the bubbling has stopped (this means the moisture has cooked off completely) scoop them out with a slotted spoon.

Then CAREFULLY pour or ladle your rendered lard/tallow through a cheese cloth over a strainer. It will catch all the itty bits. I usually do this right into the jars (Which should be HOT, DRY and STERILE). You aren’t actually processing these in a canner so clean, sterile, dry jars ARE necessary. I usually only leave ½ inch head space and then I pop the lids and rims on right away. They will seal tight but remember they are not “pressure or waterbath canned”. Moisture and Air are going to be the two things that can make your rendered fat rancid so getting those lids on right away to take advantage of that heat is important.


The liquid will be a yellowish color but as it cools it will become a creamy white color. You can store these in the freezer if you are so inclined. I keep one in the fridge for use, and the rest I put in my basement pantry. My basement pantry is cool and dark which makes it perfect for my canning items. This usually keeps for a solid 6 months or more. Because there is no air or moisture exposure they are shelf stable.

NOW DISCLAIMER – The National Center for Home FoodPreservation does NOT recommend this process. They do not have a process for this, however people have been doing this for a VERY long time with success. I have never had an issue. You are responsible for your health so you will have to decide if this is something you are comfortable with.


What to use lard for?
Lard can be used 1:1 in anything that would call for Crisco.
Example: in pie crust. By the way bacon fat in an apple pie crust is the bomb!

Nutritionally speaking, lard has nearly one-fourth the saturated fat and more than twice the monounsaturated fat as butter. It is also low in omega-6 fatty acids, known to promote inflammation; according to lard enthusiasts free-range pigs that eat greens, not grains, have higher levels of omega-3 fatty acids.


Tallow has a lot of uses too.

I like to use it in place of butter when cooking meat or veggies – so basically savory dishes.
You can use it to keep leather soft.
Make Soap Using Tallow. 
Tallow is an ideal fat for soap making, both because of its skin-nourishing qualities, but also because it is a homesteader's fat. ...
Use Tallow for Cooking. ...
Make Tallow Candles. ...
Make Tallow Laundry Soap. ...
Nourish Your Skin with Tallow Balm.


Thursday, January 10, 2019

Why I Can Meat

It’s convenient. Grab a jar from your pantry, pop it open, and you have wonderfully tender meat all ready to add to your recipes. I love having ready to eat, cooked meat on hand for recipes too. It makes meals go so much faster. Plus it tastes darn good. Really! Home canned meat is tender, juicy, and can be seasoned however you like.


Ground Venison with Onion in it.
It saves on freezer space. We have two freezers out in our house. A small one and a large deep freezer, but they are ALWAYS too full, no matter what I do. Anytime I can store food at room temperature, it’s a huge plus for me. Have you ever had a power outage and had all the meat in your refrigerator and freezer spoil? Yeah, me too. BLECK – it smells soooo bad AND it is an expensive loss. Not to mention trying to can or eat all that meat before it spoils is a pain. So in taking a page from my son’s Boy Scouts Motto of “Always Be Prepared” It’s a smart preparedness measure. No one wants to be stuck eating dry cereal and crackers if your power goes out… Just sayin'.


I don’t know why, but I always thought canning meat would be hard. It is SO not. I also thought it couldn’t possibly be safe. WRONG. Low acid veggies tend to be the main culprit in the US for botulism. (Who knew?!) The pressure canning process kills everything.


It is really easy to do so don’t be intimidated. Be sure to trim the gristle, bruised areas and excess fat. Meat MUST ALWAYS be processed in a pressure canner. There are no exceptions (that I am aware of). The processing times may seem rather long, but trust me, the time is worth the investment. You can process in broth/water or dry raw pack. (If dry raw packing, the meat will make it’s own juice).

Ground Meat: As in beef and venison are really versatile too.  They go great in:

Burritos,
Chili,
Hamburger helper,
Spaghetti sauce,
Tacos (can we say Taco Tuesday in the House?!)


Ham is another really handy one to have. I usually cube it up. If I had a large Sunday Ham with a bunch of left overs, I will can up the extra. I use it in:

Au gratin & Scalloped Potatoes


Chicken Soup -
Fresh out of the Pressure Canner.
Chicken Breast. I usually cut this into ½ to 1 in cubes 

Soups (Chicken, Tortilla, White Chicken Chili)
Chicken Salad
Chicken Alfredo
BBQ – just shred it up, toss it into the crock-pot with some BBQ Sauce and throw a pack of buns next to it and bam! Happy munching. (great for potlucks too)


Roasts and cut meat are great too. Tenderloin, Roasts, are fantastic. I just cut them up to the size I want or even different sizes in different jars for variety. I usually add a quarter of an onion to each quart too. It is really good right out of the jar (yes you can eat it right out of the jar). The juice is what I use for my gravy bases too. There is some serious flavor there.

Beef Roast
Venison Roast
Pot Roast
Stews
Beef Stroganoff


Asparagus, Mixed Veggies 
and Ground Beef
There are loads of recipes on YouTube and the internet, but I always use my Ball® Blue Book® Guide to Preserving for cooking times and for reference. It is likely the most used book in my house (second only to my Bible devotions).

One more note, I bring canned meat with me when camping. It eliminates the need for cold storage for meals with meat. It is shelf stable. You just have to make sure not to break the jar LOL.


Send Me A Message

Name

Email *

Message *